Rosco Installation Information
If you are unsure about proper installation techniques, contact a professional. It is more cost effective to have the installation done right the first time. Be sure to give your installer this link for reference. Failure to follow the instructions will lead to issues. Instructions herein are not all inclusive and installation best practices should be followed by a qualified installer or mechanic using the attached documents.
Special Mounting Notes:
- For the windshield glue to work correctly, the glass must be between 50 and 100 deg F or 10-38 C.
- Do not use glass cleaner. Only the provided cleaning pad and 1 per vehicle. 70% isopropyl alcohol will also work. Commercial glass cleaners contain surfactants & denatured alcohol which can reduce the effectiveness of the adhesive.
- Let the primer cure for 30-60 minutes depending on the temperature (longer for colder conditions).
- Press and hold the mount to the glass for 30-60 seconds.
- No other mounting technique works long-term as determined by testing done by 3M Corp. 3M automotive tape will not work long-term.
Tips:
- Installation is not complete until you view a live connection and download and view a 3 second video clip from your online account.
- SD card & Camera Head Removal - It is very important that you properly power off the camera before removing the SD card or mounting the camera head (**ignition must be off**). Failing to do so may corrupt the SD card or camera firmware, potentially causing a loss of all data.
- DV4 - To remove the SD card, with the ignition off, power the unit down per the unit instructions and then remove the SD card. The ignition may be off but the camera can still have power so be sure to follow this procedure. To remove the camera head, be sure the ignition is off.
- The camera off delay has an auto shut down in case the battery level drops.
- The larger DV4 cellular antenna mounts with the larger side to the glass.
- Use a poke and wrap or solder connections. Crimp connectors and fuse taps are not recommended.
- Zip tie all wire connections going into the unit, especially around the USB connections.
- Avoid the airbag system.
- Upgrade to a larger SD card for more recording time. The more cameras on a vehicle, audio recording, etc., divides the storage space among these files. A factory supplied/approved SD card is required due to extreme conditions encountered.
- If the camera does not transmit data after confirming power and ignition and check connections. Contact support.
Replacing a Windshield
- Order and maintain adhesive kits so they are readily avalable when a windshield is replaced.
- Carefully remove the mount from the glass.
- Remove the old mounting pad and primer from the mount.
- Follow mounting instructions as if a new installation.
- DV6 customers can use the web portal live view to confirm the camera perspective.
- For a new installation, use the Rosco installation mobile app.
Harnesses
- DV673 for hardwire
- DV665 for OBDII
- DV672 for Jbus
References
- DV6 Installer app - Click here for Android and iOS
- DV6 - Getting Started
YouTube
- DV6 - https://youtu.be/KGOOwmpB02E?si=mk_1i3agDT0XKgkS
- DV4 - https://youtu.be/WcIRZeqEhIc?si=Qb-k153JyKL8eJgt
Documents (email support@fleetistics.com if links fail)
- DV6 Quick Start and Install Guide v9.23.pdf
- DV4 Mounting Instructions.pdf
- DV4 Installation v9.23.pdf
Backup and Additional Cameras
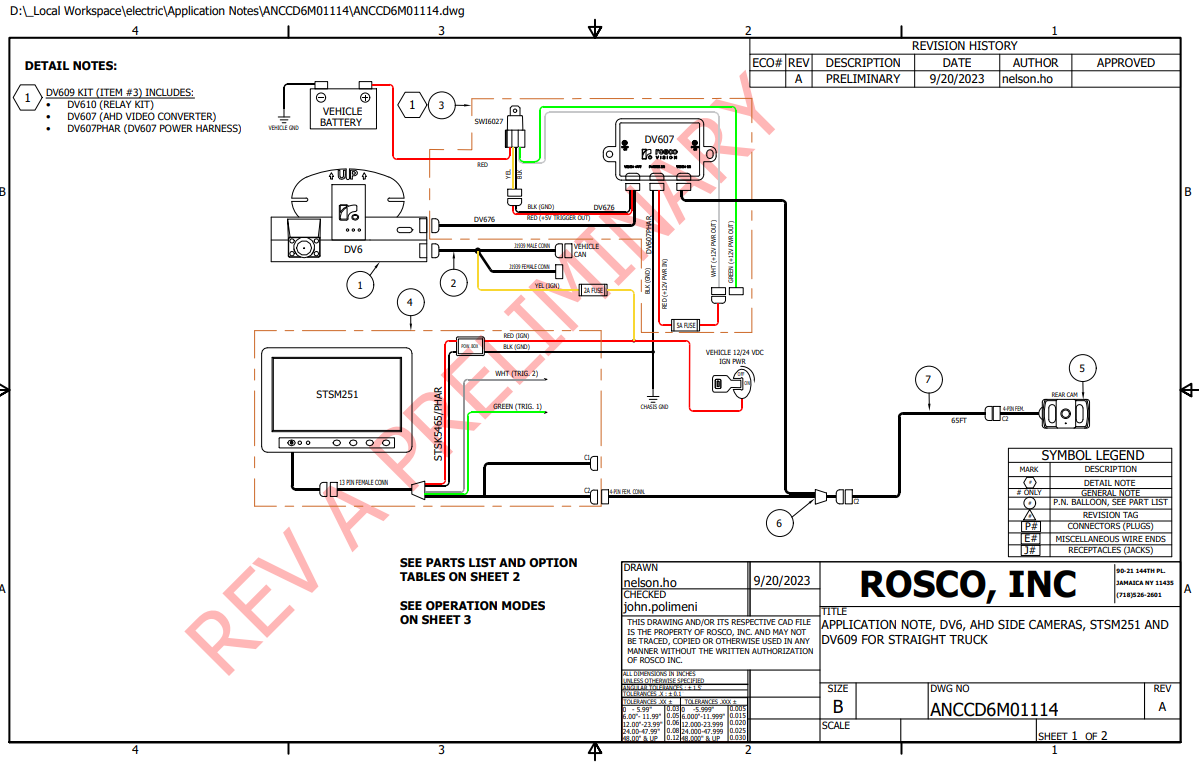
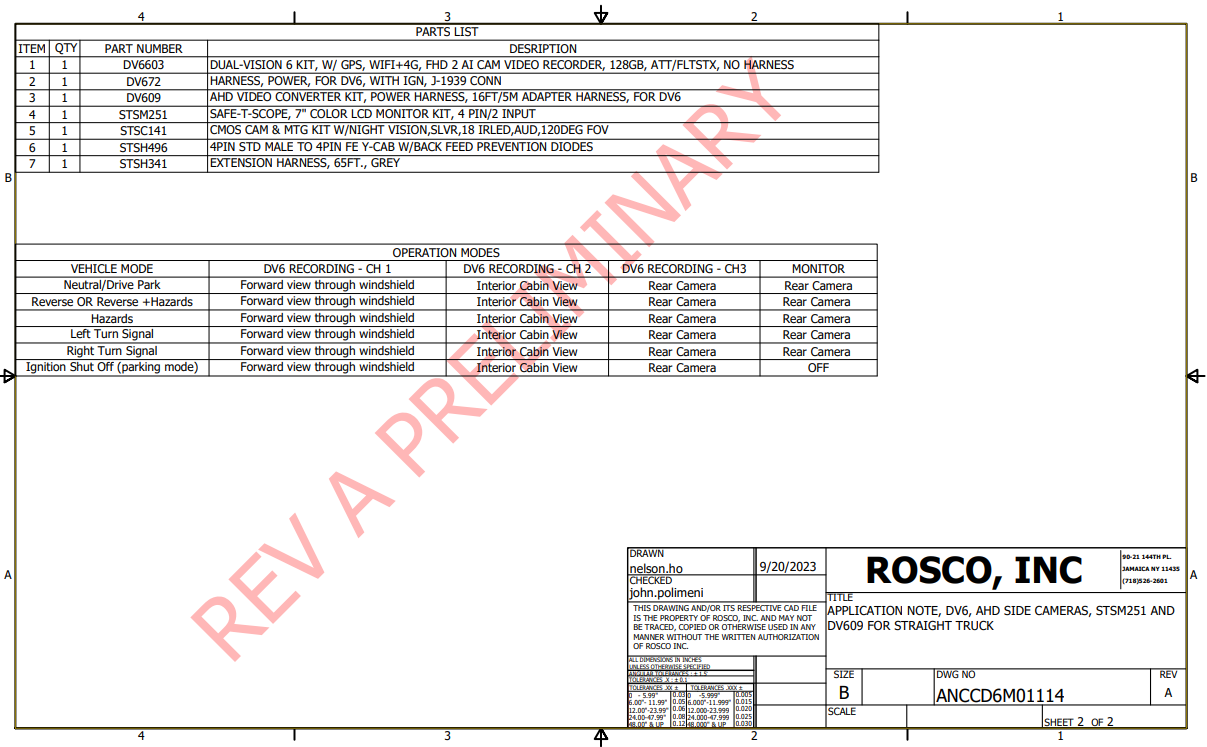
- Single External Camera - (example backup camera) - A DV609 converter box is required
- For 2+ external cameras, a STSS1200 mulitplexer (splitter) is required in addition to the DV609